How To Read A Wind Mitigation Form
So, you had a wind mitigation inspection. The inspector has done their job and you’ve received the completed form. Now what? What does it all mean? Let’s be honest—the wind mitigation form leaves a lot to be desired when it comes to readability! 😳
Important update: This article has been revised to reflect the new Wind Mitigation Inspection Form implemented on April 1, 2026. If you’ve read this article before, be aware that the form has changed and now includes additional sections and refinements.
Under the updated form, there are now 9 sections, not 7:
- Building Code
- Region
- Roof Slope
- Roof Coverings
- Roof Deck Attachment
- Roof to Wall Attachment
- Roof Geometry
- Sealed Roof Deck – Secondary Water Resistance (SWR)
- Opening Protection
During the inspection, the inspector evaluates each of these areas of the home and completes the form based on what can be visually confirmed and documented. In the sections that follow, we’ll break down each category, explain what the inspector is looking for, and help you understand how to read the information provided.
While we can’t tell you what specific discounts or credits your insurance company may apply, we can help you clearly interpret what the form says—and what it doesn’t—so you’re better prepared when discussing it with your agent or insurer.

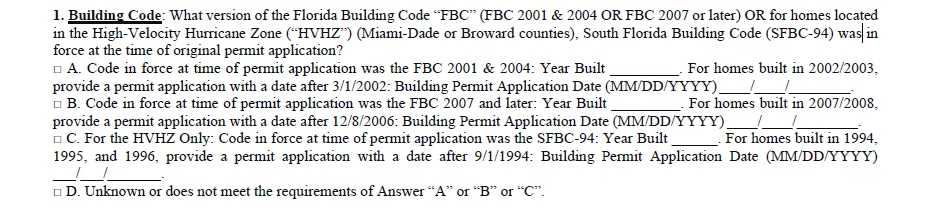
Building Code
This is based off the year the home was built and isn’t something you can change or upgrade. Homes built after 2002 may fall under “A”, homes built after 2007 may fall under “B”, (this is a new option added to the form). Everything else defaults to will fall under “D”.
(Option C is only valid for Miami-Dade or Broward counties)
Region
This section is entirely location‑based and has nothing to do with how your home was built or what features it has. It’s determined by the design wind speed for the area where your home is located, based on updated wind maps used by the building code.

Roof Slope
This section looks at how steep your roof is, not what material it’s made of or how old it is.
The inspector is determining whether the main portion of the roof is considered steep or low‑slope. If a home has multiple roof slopes (which many do), the inspector will look at whichever slope makes up at least two‑thirds of the main roof area and use that to complete this section.
This isn’t something most homeowners know off the top of their head, and that’s okay. The inspector measures or verifies the slope during the inspection.

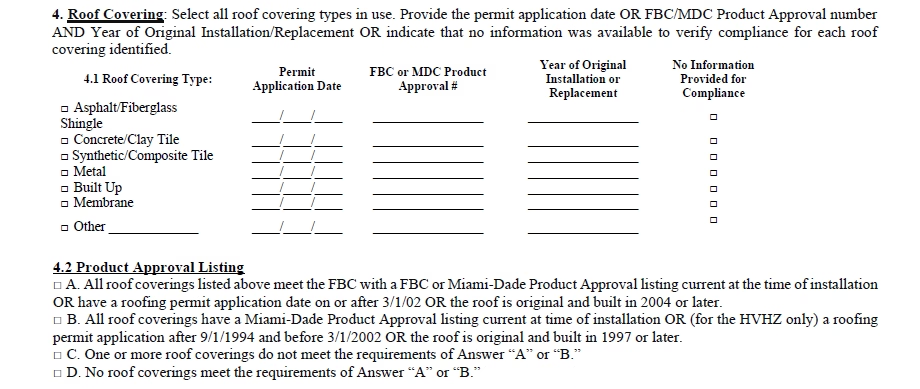
Roof Coverings
You guessed it! The inspector is checking what kind of material is on the roof. This section has two parts. The first part the inspector will be listing: The permit application date, Product approval number (if available), The year of installation, or No information provided. The second part is filled out based on the dates of the roof(s) installation.
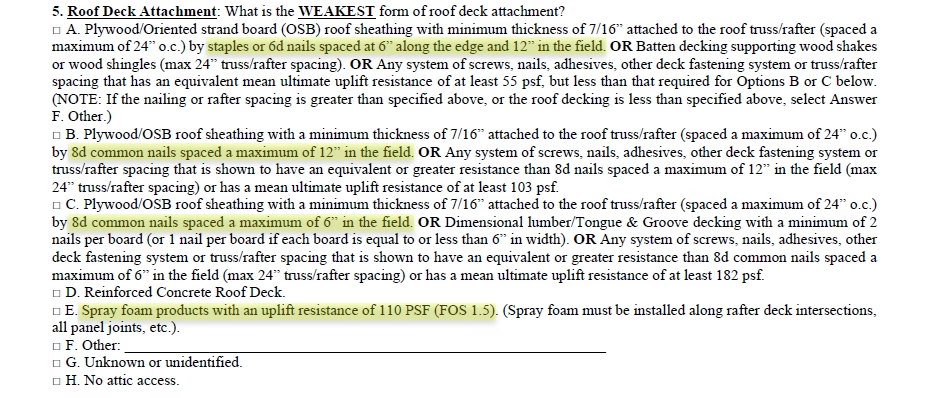
Roof Deck Attachment
This section deals with how the roof is installed. From the type of nails and how they are spaced to the type of sheathing or decking (plywood, OSB, Dimensional lumber). New roofs are put down using 8D nails every 6 inches, whereas older roofs may have used 6D nails or staples spaced 6 to 12 inches apart.
With the updated wind mitigation form, spray foam products are now listed as an option in this section. This is referring specifically to closed‑cell spray foam applied to the underside of the roof deck, not traditional attic insulation.
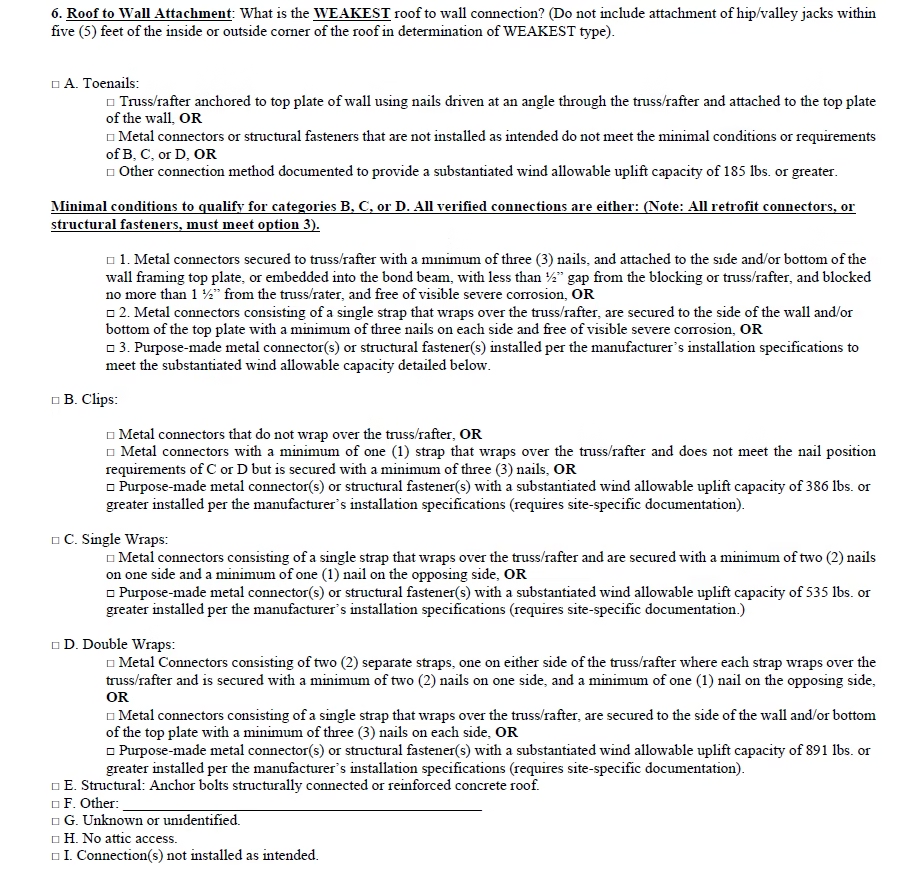
Roof to Wall Attachment
If you’ve heard the term “clip”, “strap” or “third nail”, this is where is matters. The inspector needs to look at how the roof is attached to the structure and determine the WEAKEST connection.
To qualify for potential discounts, the roof‑to‑wall connection needs to meet one of the form’s minimal conditions, such as having three nails at the connector or an approved purpose‑made retrofit connector installed per manufacturer requirements.
With the updated wind mitigation form, this section has expanded significantly. The form now breaks attachments down into more specific categories and includes “purpose‑made” connectors. These purpose‑made connections are referring to retrofit products that were installed after the home was built and must be installed per the manufacturer’s specifications. Documentation is typically required for these to count.
Sometimes the inspector can’t see the end of the truss due to a low‑sloped roof, lack of attic access, or stored items. In those cases, the inspector may request permission to remove a section of soffit to see if the roof‑to‑wall connections are visible.
If this is something you need and would like a quote, we recommend working with Maximum Solutions @ thirdnail.com.
Roof Geometry
Shape of the roof. We have 3 options: Hip, Flat or Other. Certain roof shapes, such as hip roofs, are aerodynamic in nature and reduce the chances of uplift or detachment of roofing materials. Under most circumstances you’re not going to change the shape of your roof, but this is something to keep in mind if adding an addition to the home. If you have a hip roof, you certainly wouldn’t want to have that credit taken away!

Sealed Roof Deck/Secondary Water Resistance (SWR)
Most roofs have some kind of water barrier, but this section is referring to additional protection beyond standard underlayment. Originally, this primarily meant self‑adhering or peel‑and‑stick materials applied to the roof deck. SWR helps reduce water intrusion during wind‑driven rain and adds an extra layer of protection against potential water damage.
With the updated wind mitigation form, this section has been expanded to include additional methods of sealing the roof deck, not just peel‑and‑stick products. These include taped seams, multiple layers of underlayment, and certain spray foam applications (closed cell) that are installed specifically to seal joints, seams, and penetrations. As with other sections, the inspector can only give credit for what can be visually verified and documented.

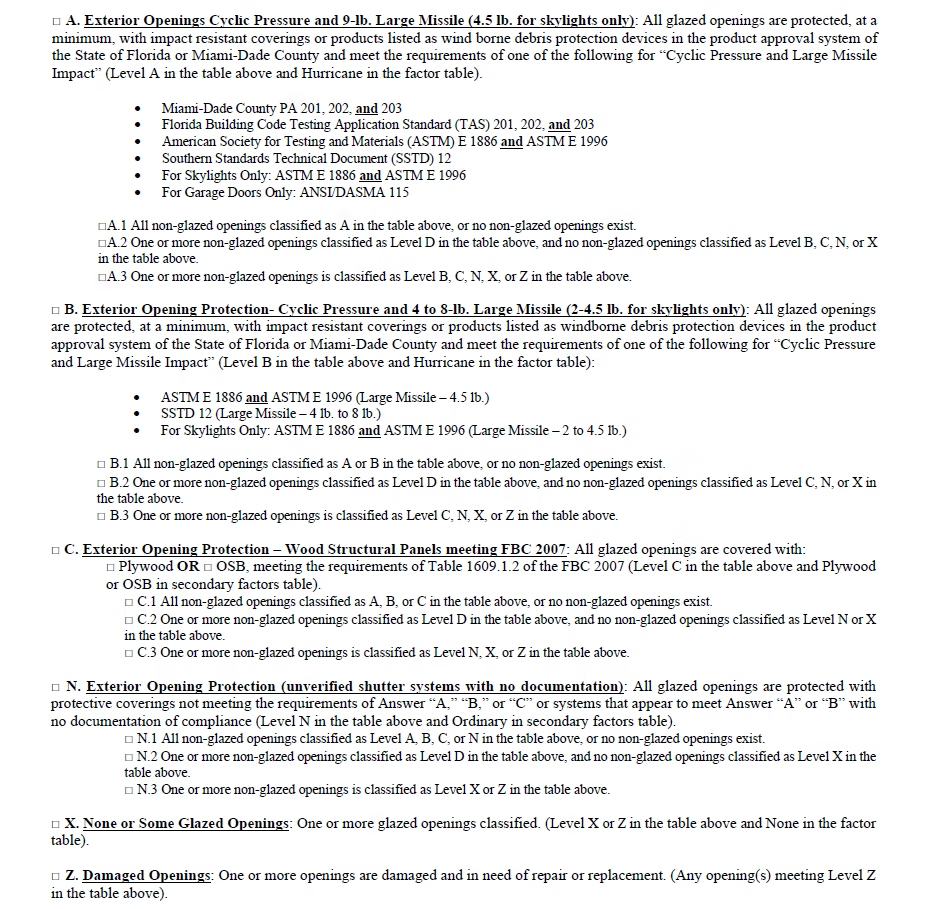
Opening Protection
This is where hurricane protection for windows and doors come in to play. First thing to note is in the chart below openings are broken out into “Glazed Openings” and “Non-Glazed Openings”. Easiest way to explain is the term “Glazed” translates to glass. So, glazed openings refer to windows, sliding glass doors, skylights or any other opening that has glass (this includes a garage door that has glass windows). An example of a non-glazed openings would be a solid front door, side door or solid garage door. Another thing to keep in mind, it’s all or nothing! Every glazed opening must have some type of hurricane protection or coverage to qualify for any potential credit.
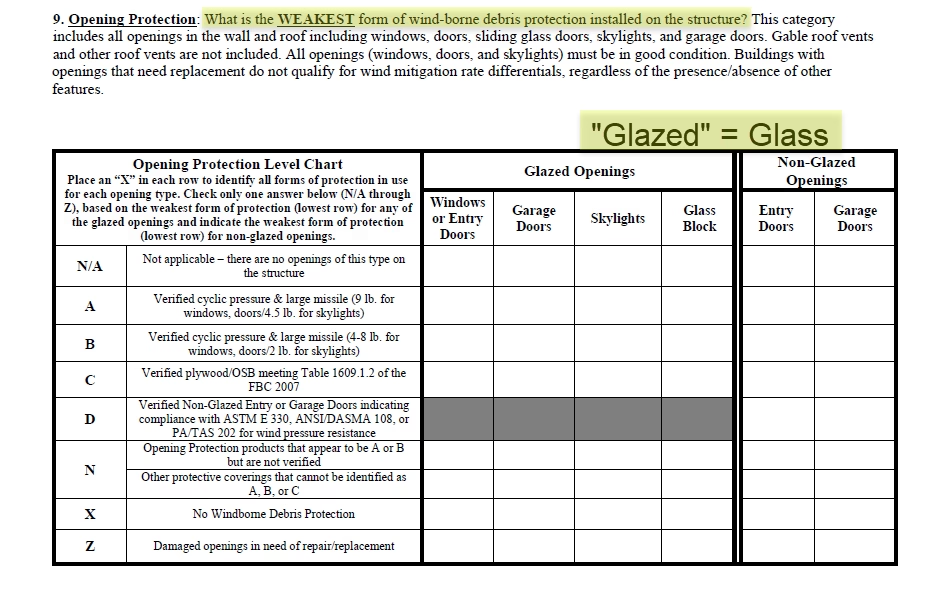
Using the chart above, the inspector will check the corresponding boxes below. Glazed opening will determine which letter is checked. The Non-Glazed openings will determine the number below the letter in that same section.
Example: All the glazed openings above are checked in rows “N/A” and “A”. The non-glazed openings are checked in rows “X”. Below would show “A.3.”
If any items in the glazed openings section above is checked in row “X” or “Z”, no credit will be given below.
Clear as mud? 🙂
If you take some time to go through the different sections of the wind mitigation inspection form, you can get a better idea of the strengths and weaknesses of your property when it comes to windstorms. This can help you make informed decisions about insurance coverage and take necessary measures to mitigate any risks. Armed with this knowledge, you may be able to secure more favorable policy quotes. I hope this helps! 😊